5 Tips to Improve your Sourdough Bread Scoring
Improving my sourdough bread scoring was something I had in mind since the first time I baked a sourdough loaf, and was dissapointed at how it looked. The taste was great though! don’t get me wrong haha, but I wanted a loaf that reflected all the time and effort it was put in.
You are probably feeling the same way too if you are reading this! and I’m so glad because the below tips have absolutely changed how my loaves look and hopefully from now on your’s too.
Before we dive into the tips, I have to say that today, after having scored thousands of loaves I feel comfortable on what I’m doing and that is why I prepared this post! I wish someone could have told me this years ago before figuring it out on my own.
So the most important questions…
What does scoring mean?
Scoring means performing cuts over the doughs crust on the unbaked loaf, just before it goes into the oven. It can be performed with a sharp knife, razor blade, scissors.
Why do we score sourdough breads or any bread?
Its SUPER important to score your bread, because the last rise of a sourdough bread and mostly any bread – happens inside the oven. That said, you need to tell the dough from where it needs to rise from. By performing cuts, you are creating weak sections on the crust that will make the dough understand where it needs to rise from.
If you don’t score your bread, your loaf will have no IDEA where it should rise from and it will just burst and open at its weakest point. Which won’t make your loaf look pretty.
Tip 1 – Use a sharp razor blade for sourdough bread scoring
Use a clean and sharp razon blade because you want to make clean cuts and not drag the dough with you. Remember that at this point your loaf is holding plenty of CO2 inside produced by the yeasts. Therefore if you are dragging the dough with you by not using a sharp razor blade, you will be compromising the entire structure of the loaf and losing its full potential to rise in the oven.
I always clean the blades I’m using after scoring my sourdough breads and I change them after scoring approx. 80 loaves. So for home bakers, you can easily have the same razor blade for 1 year. Just make sure you clean it and use all different sides of it.
There are different scoring tools out there my favorites are:
Tip 2 – Know the bread recipe you are doing
This tip is really important, because you need to know the bread you are making in order to understand what is its full rising potential.
How do you get to know the bread you are making? by performing it several times! Yeap, unfortunately there is no way on cutting corners when learning about a specific recipe. It’s a trial and error process.
But here are some additional tips –
For example: If I am making a loaf with a higher % of whole grain flours, I know that I can’t ask that loaf to have a very good rise.
Why? because whole grain flours interfere in the gluten structure, therefore the higher the % of whole grains the less rise you’ll get out of your loaf.
On the other hand, if you are making a sourdough bread out of 100% white flour, you know that that loaf has a very good rising potential. Then, when scoring you should have that in mind
Tip 3 – Ask yourself, is the dough underproofed, overproofed or just at its point?
Underproofed loaf – you want to make deeper cuts than usual, to help create more ways for the C02 to come out the loaf once its baking. That will help you make the dough rise a little better.
I don’t like baking loaves that are too underproofed because even with the scoring is hard to fix them. If your sourodugh loaf is underproofed you could take it out of the refrigerator after the cold fermentation stage to leave it for some hours at room temperature before you bake it to help it with the rise. As the dough is cold – you have at least 3-4 hours in which you can leave an underproofed dough rise before being baked.
If your sourdough bread is underproofed it could also have to do with how active and strong your starter is – so if you think you might be having issues with that check out this post
Overproofed loaf – you want to create fewer and shallower cuts over your dough. Because an overproofed dough, has a weaker structure – therefore by not making too many cuts you are helping the structure hold itself.
Just at its point – proceed as you would normally!
Tip 4 – What direction should I make the cuts?
It will depend on the shape of the loaf you are making. If you make the cuts on the “wrong direction” it will change the shape of the loaf, and I explain that below.
So its recommended that for:
Round Shaped Loaved – you want to make sure that your cuts are evenly distributed.
Oval Shaped Loaves – you always want to make the main cuts lengthwise!
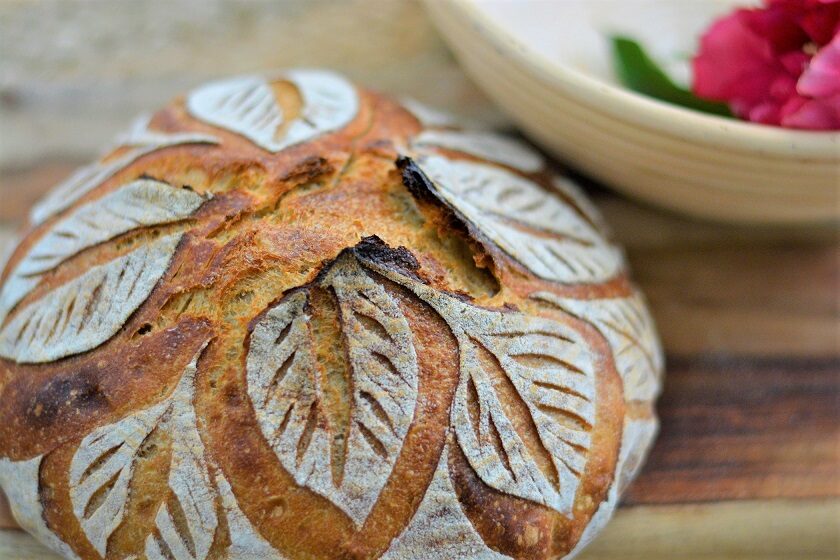
Tip 5 – Do I want to create an ear or an overall even rise?
If you want to creat an ear, perform 1 major cut. If you want to add additional designs make sure that you don’t make them deep. Just superficial do that the dough is not able to tell that it needs to rise from there.
If you want to create an even overall rise – make sure you create a pattern of same size and depth cuts. That way your loaf will be able to expand evenly in the oven.


You May Also Like

Sourdough Discards Oatmeal Cookies

Dulce de Leche Dessert Crepes
